

A proper SQL Server uninstall is a crucial aspect of database management. In this guide, the experts at DB Serv will walk you through everything you need to know to remove such software.
Understanding SQL Server Components
To comprehend the process of uninstallation of Microsoft SQL Server, let’s first break down its components:
● Database Engine: The core component responsible for storing and retrieving data and ensuring transaction integrity.
● SQL Server Management Studio (SSMS): A tool used for configuring, managing, and administering database instances.
● SQL Server Analysis Services (SSAS): A component enabling the creation of workflows for extracting, transforming, and loading data into SQL Server databases.
● SQL Server Reporting Services (SSRS): A tool aiding in creating, managing, and deploying interactive and visually appealing reports.
If you wish to uninstall SQL Server, all its components must also be removed. Each of them needs to be uninstalled separately.
Importance of Clean Uninstallation
A correctly executed process not only guarantees the deactivation of database components but also contributes to enhancing the performance of your IT infrastructure. Therefore, a clean uninstallation is crucial for enterprises using SQL Server, providing you with:
➡️ Data integrity maintenance.
➡️ Optimization of server resources in use.
➡️ Proper preparation for SQL Server updates or migrations.
➡️ Compliance with security standards in your data environment.
➡️ Improvement of overall performance.
How to Prepare for Uninstallation?
To uninstall SQL Server correctly and without errors, you need to:
1. Back up your data. This is necessary so that you can restore your databases to their current state in case of unexpected issues during deactivation.
2. Suspend the operation of all services and apps interacting with SQL Server. This prevents data corruption or loss during uninstallation.
3. Document all configurations, including server settings and other customizations. These records are needed for smooth reconfiguration after reinstallation or migration to another instance.
4. Ensure administrative access. To uninstall SQL Server, make sure you have administrator privileges.
5. Identify external dependencies, applications, or services. This step is necessary to avoid negative impacts on other systems and to resolve dependencies after uninstallation.
Methods for Uninstallation
How to uninstall SQL Server? You can choose one of the two most reliable and proven methods. The experts at DB Serv have prepared step-by-step instructions for each of them.
1. Using Control Panel
You can SQL Server uninstall through the control panel provides a convenient and straightforward approach. Follow these steps:
✅ Click the “Start” button, type “Control Panel” in the search bar, and click on the icon that appears to open it.
✅ Select “Programs” and then “Programs and Features.”
✅ Find “Microsoft SQL Server” in the list of installed programs.
✅ Right-click on the SQL Server instance you want to remove and select “Uninstall/Change.”
✅ The SQL Server Installation Center will open. Select “Remove SQL Server instance.”
✅ Follow the wizard’s instructions to complete the uninstallation process. Ensure the correct selection of the instance and components to uninstall.
✅ Click the “Remove” button to start the removal process.
By following these steps, you will be able to successfully uninstall SQL Server from your computer.
2. Using Command Prompt
Uninstallation via the command prompt is an effective way to deactivate one or multiple instances of SQL Server. Follow these instructions:
● Open the command prompt with administrator privileges.
● Navigate to the directory where the SQL Server setup executable files are located.
● Enter the following command to locate the desired instance:

● Specify which SQL Server instance you want to uninstall. To do this, open “Notepad” and create a file named ConfigurationFile.ini. Add the following contents:
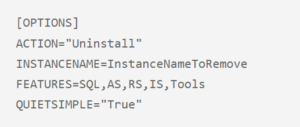
Note: Replace InstanceNameToRemove with the name of your instance.
● Start the uninstallation by navigating to the SQL Server Setup.exe file of the instance to be removed and entering the following command:

Note: Replace Path\To with your actual path to the configuration file.
● Press Enter to execute the command and wait a few minutes for the SQL Server installer to complete the process.
● Monitor the uninstallation progress through the log file located at: %programfiles%\Microsoft SQL Server\130\Setup Bootstrap\Logs.
Using the command prompt is an effective and straightforward method but is suitable for more experienced users or automation scenarios.
Verifying Complete Removal
Once you have determined the most suitable method, you can easily uninstall SQL Server from your system. Then, you need to verify how successfully the process went. To do this:
● Check the Control Panel. Go to “Programs and Features.” The uninstalled SQL Server will not be displayed in the list.
● Check for SQL Server keys in the registry editor. Use the following paths:
● HKEY_LOCAL_MACHINE\SOFTWARE\Microsoft\Microsoft SQL Server;
● HKEY_LOCAL_MACHINE\SOFTWARE\WOW6432NODE\Microsoft\Microsoft SQL Server (for 64-bit systems).
● Check SQL Server services. Press Windows + R to open the “Run” window. Type “services.msc” and press Enter. Open the “Services” application and make sure SQL Server services are no longer listed.
● Restart the system. This will help ensure that all outdated processes or services related to SQL Server are completely terminated.
Common Problems and Solutions
When users want to uninstall SQL Server, they may encounter some issues after the procedure:
➡️ Incomplete removal. Resolve this by removing residual files and directories associated with SQL Server manually. If necessary, repeat the uninstallation process.
➡️ Issues with service removal. Open the “Services” application (services.msc) and manually disable or remove any remaining services.
➡️ Error messages. Find the error code on the official Microsoft website and follow the instructions to resolve it.
➡️ Insufficient permissions. Before you uninstall SQL Server, check if you are acting as an administrator and if you have all the necessary permissions. Run the uninstallation process from the command prompt with elevated privileges.
Conclusion
Now you know how to uninstall SQL Server and what preparation is needed. Remember that strict adherence to instructions is necessary for a clean deactivation and to avoid issues.
Want to completely clean your computer from the outdated version of the database? DB Serv experts are ready to uninstall SQL Server according to all the rules and help you set up the operation of a new instance.